Fiber Optic Lamp: How They Work and How to Make One in Resin
Updated 16 October 2026

A fiber optic lamp is one of those objects that never quite loses its charm. A spray of fine strands fans out from a base, each tip glowing with a point of colour that slowly shifts from blue to violet to amber. Most of us remember them from the 1970s or a childhood bedroom, but the same principle now lights star ceilings, signs, sculptures and resin art. This page explains how a fibre optic lamp works, what to look for when buying one, and how to make your own lamp by setting fibre optics in resin.
How a fiber optic lamp works
Every fibre optic light has two parts: a light source and the fibres. The fibres themselves are strands of clear acrylic (PMMA) or, in technical uses, glass. Each strand has a core surrounded by a thin cladding with a slightly different refractive index. Light entering one end bounces along the inside of the core by total internal reflection, so very little escapes until it reaches the far end, where it emerges as a bright dot.
In a classic lamp, the strands are gathered into a tight bundle at the base and held in a collar directly above a bulb or LED. Light shines into the polished ends of the bundle and travels up every strand at once. The other ends fan out freely, so you see dozens or hundreds of glowing tips. Because the strands carry light rather than electricity, the tips stay cool and safe to touch.
How colour changes
Vintage lamps used a halogen or incandescent bulb with a rotating colour wheel between the bulb and the bundle, turned by a small motor. As the wheel turned, different coloured segments passed under the fibres, so the colours drifted across the spray. A modern LED fiber optic light usually does the same job electronically, mixing red, green and blue (and sometimes white) LEDs, which means no moving parts, less heat and modes such as fade, flash and static colour.
Types of fibre optic lamps and lights
- Classic spray lamps: a vase or cone base with a fountain of loose strands. Decorative and nostalgic.
- Sensory and mood lights: long soft-touch strands, often used in sensory rooms because they are safe to handle and the colour changes are calming.
- Star ceilings: hundreds of strands pushed through a ceiling board, popular in home cinemas.
- Fibre optic sculptures and wall art: strands set into wood, acrylic or resin so only the tips show, creating patterns of light.
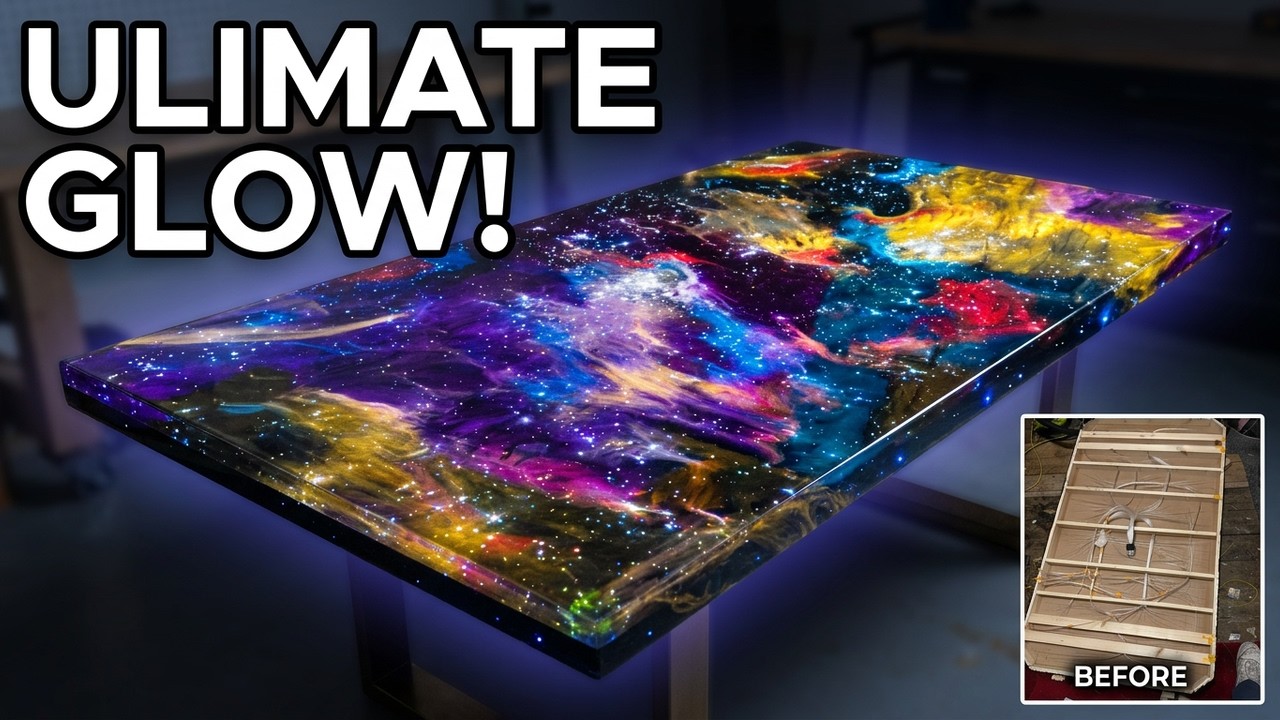
- Furniture: the same idea on a larger scale, as in a fiber optic resin table with a star field across the top.
What to look for in a fiber optic light kit
If you want to build rather than buy, a fiber optic light kit usually contains a light engine (also called an illuminator), a remote control and a bundle of strands. Points to check:
- Strand count and diameter. Kits are sold by number of strands and diameter, often 0.75mm, 1mm or 1.5mm, and by length. For a lamp, 1m to 2m strands are usually plenty.
- Port size. The light engine port must take your whole bundle comfortably. An overfilled port leaves outer strands dim.
- Light source power and cooling. Small lamps need only a small LED source. Larger engines have fans, which can hum, so check noise if the lamp is for a bedroom.
- Colour options. RGB gives colour; RGBW adds a cleaner white. A twinkle mode makes tips flicker like stars.
- Power supply. Look for a certified mains adaptor or USB power. USB-powered sources are ideal for small desk lamps.
- Fibre quality. Good PMMA strands look glassy, not milky, and throw a bright, even dot from a cleanly cut end.
How to make a resin fiber optic lamp
Setting fibres in resin gives you a lamp that looks like a block of glass with stars or light trails frozen inside. The method below makes a cube or cylinder lamp around 10–15cm across, sitting on a wooden or resin base that hides the light source. It is a good first project before attempting anything at furniture scale.
You will need
- A silicone mould (cube, cylinder or dome) and a timber or resin base block deep enough to house the light source
- A small USB or mains LED fibre optic light source with a bundle port
- End glow fibre, 0.75mm and 1mm, around 50–150 strands depending on the design
- Clear casting or deep pour epoxy rated for the depth of your mould
- Drill and bits matching the fibre diameters, flush cutters, sandpaper from 120 to 3000 grit and a polishing compound
- Nitrile gloves, eye protection and a respirator suitable for organic vapours; work in a well-ventilated space
Step by step
- Design the pattern. Decide where the light points will sit inside the block. Tips can stop at different heights to create depth, or run all the way to the top face to show as surface stars.
- Prepare the base. Drill a cavity in the base for the light source and a channel up to the top face where the bundle will rise. Drill holes in a thin acrylic or timber plate that will sit at the bottom of the mould.
- Thread the fibres. Feed strands up through the plate, cutting each one to the height you want inside the block. A clean, square cut gives the brightest point. Gather the tails below the plate into a bundle and fit them into the light source collar.
- Test before pouring. Switch the light on in a dark room and check every strand glows. Fix any that do not now.
- Pour. Seal the plate into the mould and pour resin slowly down the side so it rises around the fibres without pushing them over. In a room at around 20–25°C, follow the maximum pour depth for your resin; acrylic fibre can soften if a thick, fast-curing mass gets too hot, so use a slow-curing resin or pour in layers. Our guide on how to pour epoxy resin covers mixing and bubbles.
- Cure and demould. Leave it for the full cure time, usually several days for thicker pours, before demoulding.
- Finish. Trim any strands that break the surface flush, then sand through the grits and polish so the block is crystal clear. See how to polish epoxy resin for the sequence.
- Assemble. Fix the block to the base, route the cable out of the back and add felt pads underneath.
For extra effect, add a layer of glow in the dark epoxy near the base so the lamp still glows faintly after it is switched off, or set a small object in the clear resin as described in our guide to preserving flowers in resin. If you are new to casting, start with our epoxy resin for beginners page and a reliable epoxy resin kit.
Fibre optics vs LEDs in resin lamps
You can also light a resin lamp by placing an LED strip or puck directly beneath it, so the whole block glows. That is simpler but gives a wash of light rather than points. Fibre optics give crisp, separate points and keep all heat and electrics out of the resin. For the strip-based approach on a larger scale, see our LED epoxy table guide.
Safety and care
- Use certified low-voltage power supplies and never seal the light source inside resin; it needs air and must be replaceable.
- Keep loose-strand lamps out of reach of very young children, as the fine strands can snap.
- Dust strands and resin blocks with a soft, dry cloth. A drop of plastic polish restores a dulled resin surface.
- Switch off when you go out, and check the cable and adaptor occasionally for damage.
Top 10 most-watched on YouTube
Video 1 of 10 — one of the most-viewed YouTube videos for “fiber optic lamp: how they work and how to make one in resin”: This Man Is Genius. Unbelievable Fiber Lamp Build by Totally Handy (2,844,933 views as of 13 October 2026).
For the physics behind the glowing tips, Wikipedia’s article on optical fibre explains how a core and cladding trap light by total internal reflection, and covers the plastic fibres used in decorative lamps and lighting.
Watch it being made
See one of our tables come together in the workshop: a nebula resin top with fibre optic stars, from the first pour to the lights going on.
Resin art nebula resin table with fibre optic art. More builds on the Go Bespoke YouTube channel.
Frequently asked questions
Do fibre optic lamps get hot?
The strands stay cool because they carry light, not electricity. Only the light source in the base gets warm, and modern LED sources run far cooler than old halogen bulbs.
How long do fiber optic lamps last?
The acrylic strands last for many years if not snapped or bent sharply. LED light sources typically last thousands of hours, and in a well-designed lamp they can be replaced separately.
What is in a fiber optic light kit?
Usually a light engine or illuminator, a power supply, a remote control and a bundle of end glow strands of a set length and diameter.
Can you put fibre optics in epoxy resin?
Yes. Acrylic fibre casts well in epoxy as long as the resin does not overheat during the cure. Use a slow-curing resin within its maximum pour depth, then sand and polish the fibre ends with the surface.
Want to see fibre optics and resin come together? Watch our builds on the Go Bespoke YouTube channel.